

An amigurumi facial feature placement guide should define eye, muzzle, nose and embroidery positions from stable crochet landmarks rather than visual guesswork. Small placement changes can alter expression and character identity. Retail buyers need measurable coordinates, approved range samples and a repeatable production method.
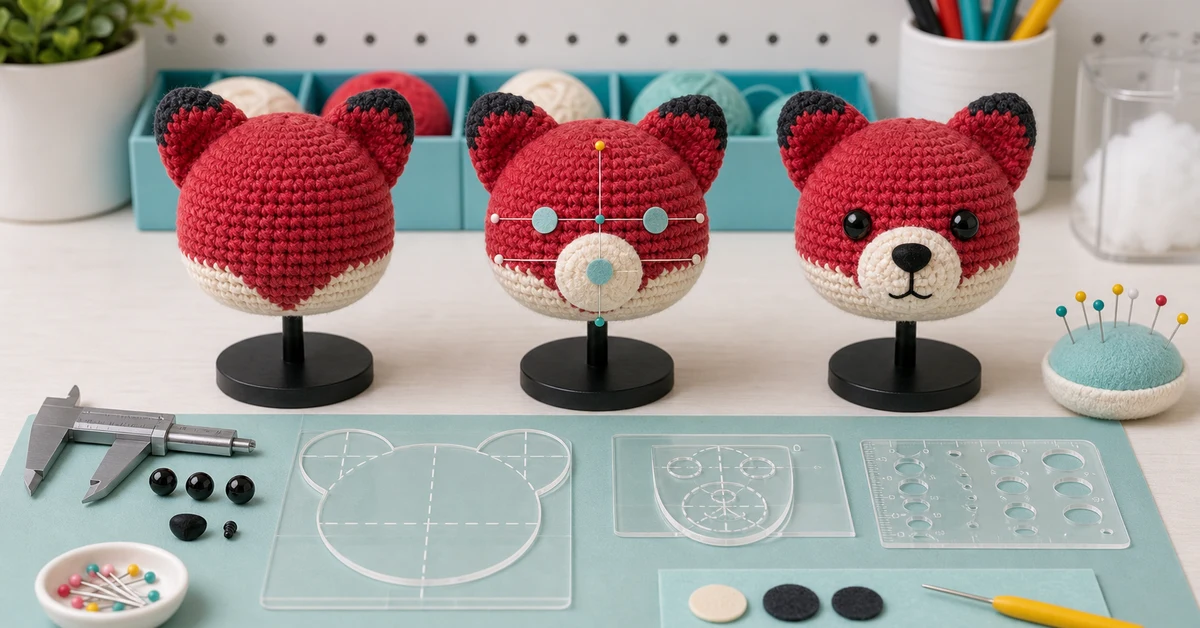
Freeze the approved character expression
Begin with front, side and three-quarter views of the approved sample. Describe the intended expression in observable terms: eye spacing, eye height, muzzle projection, nose angle, eyebrow curve and symmetry. Words such as cute or friendly are useful creative goals but not production specifications.
Identify which elements create the character's identity. Some designs depend on wide-set eyes, a low muzzle or deliberate asymmetry. Others require tight symmetry. Separate required features from handmade variation that does not change recognition.
- Eye center spacing and vertical level.
- Muzzle width, height and projection.
- Nose center and rotation.
- Embroidery start, end and curvature.
- Ear and head landmarks that frame the face.
Choose stable crochet landmarks
Use rows, rounds, center seams, increase lines and color boundaries that remain identifiable in production. Measuring from the outer head edge can be unreliable when stuffing changes shape. A centerline and named row create a more repeatable coordinate system.
Mark the face before inserting permanent components. If the head has a closing point or color-change jog, define whether that landmark belongs at the back. Orientation errors must be resolved before facial placement begins.
| Landmark | Use | Risk |
|---|---|---|
| Vertical centerline | Balances left and right positions | Shell rotates during stuffing |
| Named round | Controls feature height | Row count varies |
| Increase line | Confirms head orientation | Line is hidden by texture |
| Color boundary | Locates muzzle or mask | Boundary placement drifts |
Build a facial coordinate grid
State each feature center by row and stitch offset from the centerline. Add allowable movement where handmade construction needs tolerance. For embroidery, define anchor points and the path between them. For a separate muzzle, record attachment boundaries and projection.
Create a transparent template or flexible measuring strip that fits the approved head size. The fixture should confirm coordinates without forcing the soft shell into shape. Test it on several heads at the accepted size limits.
- Orient the head from the approved rear landmark.
- Mark the vertical and horizontal references.
- Place removable eye and muzzle markers.
- Compare front and side views.
- Install permanent features only after approval.
Test eye spacing and height as a ladder
Prepare coded samples with small controlled changes in spacing and vertical position. Photograph them under the same angle and lens. Reviewers can then define the accepted expression window instead of debating one sample in isolation.
Check interaction with ears, muzzle and head proportions. The same eye spacing can look different when stuffing or head width changes. Approve coordinates together with the accepted shell dimensions and density.
| Variation | Visual effect | Control question |
|---|---|---|
| Eyes closer | Expression may feel focused | Does character identity change? |
| Eyes wider | Face may feel broader | Do ears and muzzle remain balanced? |
| Eyes higher | Forehead appears smaller | Is the intended age or mood altered? |
| Eyes lower | Forehead appears larger | Does muzzle spacing remain clear? |
Control muzzle and nose projection
A separate muzzle changes both front coordinates and side profile. Record stuffing amount, width, height and attachment path. Centering alone is insufficient if one side is attached more tightly or the projection tilts.
Use side-view templates and light-contact depth measurement. Confirm that the nose remains centered after the muzzle is sewn and the head is handled. If glue or another attachment method is used, validate materials and market requirements separately.
Specify embroidered features
Define thread, strand count, color, stitch type, anchor points, tension and finished path. Small tension differences can pull the face out of symmetry. Retain close photographs and physical samples that show accepted line thickness and curvature.
Test the darkest and lightest color variants. Contrast can change how thick a mouth or eyebrow appears. Avoid relying on one colorway as the universal visual standard.
- Thread identity and strand count.
- Entry and exit points.
- Line path and maximum thickness.
- Accepted tension and surface indentation.
- Back-side securing method.
Check placement after stuffing and assembly
Features should be reviewed on the completed head and assembled body. Neck attachment, ears, hair, hats or accessories can change apparent alignment. A face approved on a loose head may look tilted after assembly.
Rotate the product through front, side and three-quarter views. Confirm the intended gaze and balance. Photograph the approved pose and neutral unsupported pose so production teams do not hide alignment issues by turning the head.
Run a blinded identity review
Show coded samples to reviewers without revealing which is the golden sample. Ask them to identify samples that preserve the character and describe visible differences. This separates repeatable identity signals from familiarity with one development piece.
This is where the amigurumi facial feature placement guide becomes an approval tool. Set acceptance boundaries for coordinate, symmetry, profile and expression. A sample can remain handmade while still protecting the character's essential face.
| Review signal | Possible cause | Response |
|---|---|---|
| Face appears tilted | Centerline or muzzle attachment shifted | Correct landmark and fixture use |
| Expression varies widely | Eye window is too broad | Narrow coordinates or shell tolerance |
| Gaze differs | Eye rotation is uncontrolled | Add orientation reference |
| Embroidery dents surface | Tension is excessive | Define thread path and pull limit |
Turn placement into production controls
Create a visual work instruction with orientation, landmarks, coordinates, removable marking stage and final inspection views. Use fixtures only if they improve repeatability without distorting the shell. Train operators against accepted and rejected samples.
Inspect early production pieces and samples across shifts. Record defect categories such as vertical offset, spacing, rotation, muzzle tilt and embroidery tension. A generic facial defect count is not enough to improve the process.
Challenge size and stuffing variation
Apply the coordinate system to heads at the allowed dimensional and density limits. If the same stitch coordinates produce visibly different faces, tighten the shell standard or use proportional measurements. Reapprove after changes to pattern, yarn, hook, stuffing, eyes, muzzle, embroidery or assembly.
Validate component shape, color and reflection
Eye and nose components with the same nominal size can differ in dome height, rim width, stem position and surface reflection. Compare actual production candidates on the approved head. A high-gloss eye may appear larger in photography, while a broad rim can reduce the visible spacing between components.
Test every planned face colorway. Dark yarn can hide black embroidery and reduce the visible boundary of an eye rim. Pale yarn may reveal backing hardware or internal shadows through open stitches. If component color changes between variants, confirm that the intended expression remains consistent rather than assuming coordinates alone will protect it.
Review accessories that partly cover the face, including hair, hats, glasses, masks or decorative patches. Define their placement after the core facial coordinates are frozen and inspect them in the customer's normal viewing angle. Packaging should also protect protruding muzzles and eyes from pressure that changes alignment before unboxing.
Photograph the accepted face with a controlled camera distance and neutral lens perspective. Close phone photos can exaggerate the muzzle and shift apparent eye spacing, while a high camera angle changes expression. Production review images should use a repeatable setup so remote approvers compare placement rather than camera distortion. Keep a physical reference available when image color or scale is uncertain.
Include a scale marker outside the product area and name the approved camera view. This prevents teams from accepting a face that appears correct only because the sample is rotated, tilted or photographed from farther away.
- Visible eye diameter and dome profile.
- Nose geometry and mounting orientation.
- Contrast against every approved yarn color.
- Interaction with hair and accessories.
- Appearance after packaging recovery.
Where Onehourcrafts fits
The Onehourcrafts amigurumi manufacturing page describes custom designs, yarns, accessories and packaging. Buyers can submit an amigurumi facial feature placement guide with coordinate templates and accepted expression samples.
Connect placement with the size specification guide, stuffing density test, quality scorecard and sampling process. Send the drawings, golden sample, shell standard and order assumptions through the contact page. Final attachment safety and market requirements need separate confirmation.
Frequently asked questions
Should eyes be placed before or after stuffing?
Mark and review coordinates with the shell in its intended shape. Permanent installation timing depends on construction, but final approval must occur after stuffing.
Can stitch counts alone control facial placement?
They are useful when the shell is consistent. Combine them with centerlines, dimensions and visual templates because stuffing and shaping can alter appearance.
How much asymmetry is acceptable?
Define it from approved range samples. Handmade variation is acceptable only when character identity, gaze and expression remain consistent.
What should a facial template measure?
It can locate centerline, eye centers, muzzle boundary and profile, but it should not compress the soft head into the target shape.
When should placement be reapproved?
Reapprove after changes to the head pattern, yarn, hook, stuffing, feature components, embroidery, ears, accessories or assembly method.





