

An amigurumi packaging compression test should measure how a crocheted product changes under a defined packing load and how fully it recovers after release. The goal is not to prove that a soft item can be squeezed into a small box. It is to find a package density that protects shape, seams, surface and customer-ready presentation through storage and transport.
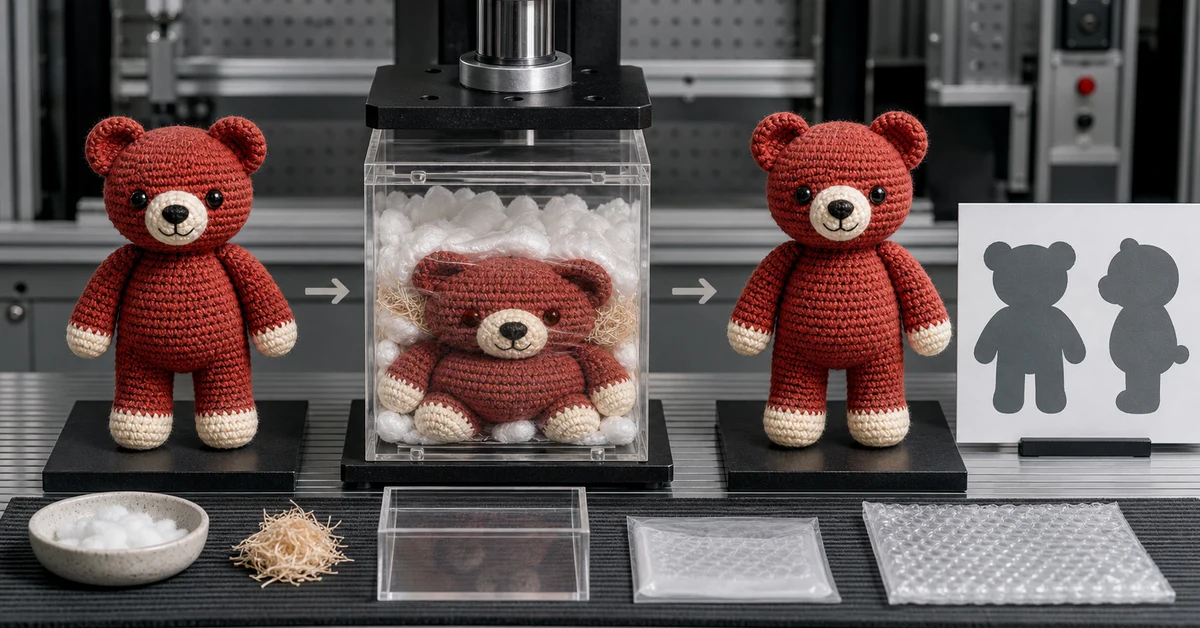
Freeze the product condition before testing
Use samples that represent approved production: the same yarn, stitch density, stuffing, internal supports, accessories and finishing. Condition them in the agreed environment and let them reach a stable shape before measurement. A newly finished toy may continue to settle, while a sample stored loosely for weeks may behave differently from fresh production.
Record the starting state from several views. Measure overall height, width and depth at defined landmarks rather than the widest point chosen by eye. Photograph the face, limbs, ears, seams and decorative details. Note softness and symmetry. If the product has a golden sample, place it beside the test item without allowing the reference itself to be compressed.
- Sample identity, production lot and completion date.
- Starting dimensions at named landmarks.
- Front, side, rear and detail photographs.
- Stuffing distribution and pose notes.
- Pre-existing defects excluded from test scoring.
Define the compression event
Compression can come from the retail carton, a tight inner bag, stacked master cartons or products pressing against one another. Reproduce the actual package architecture. State whether the toy is folded, rotated or pushed into position and whether a forming insert, tissue, bag or restraint is used. An undefined hand squeeze cannot be compared across samples.
Measure the packed cavity and calculate how much the product envelope is reduced. When possible, record closure force or use a controlled platen to compare loads. Keep the placement sequence consistent. A limb trapped under the body can create a local defect even when the average volume reduction is modest.
| Test variable | What to specify | Why it matters |
|---|---|---|
| Package cavity | Internal dimensions and inserts | Defines available recovery space |
| Product orientation | Face, limbs and seam position | Controls local pressure points |
| Compression duration | Hours or days under closure | Long storage may behave differently |
| Environment | Temperature and humidity condition | Fibers and stuffing can respond differently |
| Release method | How the pack is opened | Prevents handling from hiding damage |
Build a compression ladder
Test more than one package density. Begin with a low-compression control, then evaluate medium and proposed high-efficiency options. The ladder shows where recovery begins to degrade instead of giving only a pass or fail for one carton. Use comparable samples because repeatedly compressing the same item can introduce a history effect.
Hold each sample for a realistic duration. A short pack-fit trial may miss flattening that develops during warehouse storage and international shipping. If the commercial route is not fixed, test a cautious duration and document the limitation. The package that looks efficient after ten minutes may create permanent facial distortion after several days.
- Measure and photograph each conditioned sample.
- Pack samples at defined low, medium and high compression.
- Hold them for the agreed duration and environment.
- Release without manual reshaping.
- Measure recovery at fixed time intervals.
Plot the recovery curve
Inspect immediately after unpacking, then at agreed intervals such as one hour, one day and a longer endpoint. Measure the same landmarks each time. Some products regain volume quickly but retain a tilted head or flattened muzzle. Dimensional recovery should therefore be combined with shape and appearance scoring.
Do not massage, steam or aggressively reshape the sample unless the customer instructions explicitly require that action. If acceptable presentation depends on a special recovery step, the step becomes part of the product experience and must be tested with target users. Retailers should know whether the item is shelf-ready at unboxing or needs preparation.
| Recovery signal | Possible result | Interpretation |
|---|---|---|
| Overall dimensions return | Height and width recover | Bulk volume is resilient |
| Landmark alignment | Eyes, ears or limbs remain uneven | Local pressure caused shape memory |
| Surface appearance | Yarn remains creased or abraded | Contact or friction is excessive |
| Internal feel | Stuffing stays clumped | Distribution did not recover |
| Standing or sitting pose | Product leans after release | Base or internal balance changed |
Score defects by customer impact
Create a severity matrix before reviewing results. Minor temporary flattening on a hidden surface is not equivalent to a permanent change in the face. Define critical areas for the design, such as eye alignment, muzzle projection, ear shape, limb symmetry and the intended pose. Include seam stress and attachment security even when appearance seems acceptable.
A useful score separates recovery time from final severity. A product that looks distorted for several hours may be unsuitable for immediate gifting or retail display even if it recovers by the next day. Conversely, a small hidden indentation may be acceptable if it does not affect the product promise. Make these commercial decisions explicitly instead of averaging all observations into one number.
- Critical: safety, attachment or seam failure.
- Major: obvious permanent change to face, pose or symmetry.
- Moderate: visible temporary distortion beyond the allowed recovery time.
- Minor: limited change on a noncritical area within the approved window.
Inspect accessories, seams and surfaces
Compression can push hard accessories into adjacent crochet. Check whether eyes, noses, buttons, frames or packaged tools leave impressions. Look for yarn abrasion where the product rubs against carton edges, window film, ties or internal trays. Pale fibers may also pick up color from printed surfaces or dark accessories.
Gently examine seams and attachments after the recovery endpoint. Do not treat visible shape as proof of structural integrity. Pressure may open stitch gaps, shift stuffing through an internal channel or load an attachment differently. Use the relevant quality and safety checks for the intended market, and keep compression testing separate from any required compliance testing.
Compare package efficiency with presentation risk
This is where the amigurumi packaging compression test informs the commercial choice. Compare carton volume and pack count with the defect score, recovery time and preparation required. A modest reduction in carton size may be valuable; a maximum-compression option can create returns, poor reviews or labor at the retailer.
Consider alternatives before simply enlarging the box. A different orientation may protect the face. A shaped insert can move pressure to resilient areas. A breathable bag may avoid trapped moisture, while a soft tissue wrap can reduce abrasion. Any added material should be reviewed for cost, disposal, labeling and market requirements.
| Option | Potential benefit | Tradeoff to verify |
|---|---|---|
| Lower compression | Faster recovery and better display | Larger carton and freight volume |
| Changed orientation | Moves load away from face | May complicate unboxing |
| Forming insert | Controls pose and pressure | Adds material and assembly steps |
| Retail reshaping step | Allows denser packing | Requires labor and clear instructions |
Confirm the result in shipping configuration
A retail pack that passes static compression should also be evaluated inside the master carton. Stack loading, vibration and drops can change the direction and concentration of pressure. Use the intended pack count, dividers and carton orientation. Recheck representative products after the transport sequence and follow the same recovery schedule.
Monitor production variability. A more firmly stuffed toy may resist compression but transfer load to seams; a softer one may flatten more. Define the relevant product dimensions and feel standards before assuming one package result covers every piece. Sample across production positions and retained lots when the order risk justifies it.
Freeze the pack-out standard
Keep photographs or diagrams showing exact product orientation, limb placement, protective materials and closure sequence. State the approved compression level, maximum hold assumptions, recovery window and defect criteria. Packing teams need a simple visual standard; quality teams need the measurements behind it.
Trigger reapproval when the product dimensions, yarn, stuffing, accessories, carton, insert, bag, master pack or shipping route changes materially. A new color can matter if it changes yarn finish or transfer risk. Do not carry a successful result to a visibly similar product without checking its construction.
Where Onehourcrafts fits
The Onehourcrafts amigurumi manufacturing page describes custom designs, yarns, sizes, accessories and packaging. Buyers can use a staged compression ladder and recovery score when comparing packing options for a specific crocheted product.
Combine this amigurumi packaging compression test with the size specification guide, amigurumi quality guide, sampling process and crochet packaging options. Send the approved sample, target carton, pack count, distribution route and presentation requirements through the contact page. Product safety and transport validation should be confirmed for the actual order and market.
Frequently asked questions
How long should an amigurumi stay compressed during testing?
Use a duration that reflects realistic storage and transport, with a cautious allowance when the route is uncertain. A short fit check is not enough to predict longer-term shape memory.
Should the toy be reshaped immediately after unpacking?
First observe natural recovery without intervention. Test manual reshaping separately only if the customer or retailer is expected to perform that step.
Which areas are most important to inspect?
Prioritize the face, pose, limbs, ears, seams, attachments and any surface contacting hard packaging features. Product-specific visual landmarks should be defined before the test.
Can one sample represent a full production order?
No. Development samples establish the method, but production variation in stuffing, dimensions and construction can change recovery. Use an appropriate sampling plan for bulk verification.
When should compression testing be repeated?
Repeat relevant stages after changes to the product, stuffing, yarn, accessories, retail pack, protective materials, master carton, pack orientation or distribution assumptions.





