

A punch needle loop height guide should define the visible pile, the acceptable variation and the tool setting that reliably produces it. Product teams need side-profile samples rather than only front-view photos. Build a loop-height ladder with the approved yarn, tool and fabric, measure after the surface has rested, and select the lowest setting that creates the intended texture without unstable loops, excess yarn use or difficult beginner handling.
Decide what the pile must do
Loop height is both a visual and functional choice. Low loops can make small shapes crisp and reduce snagging. Taller loops create stronger relief and softness but consume more yarn and may reveal uneven punching. A wall piece, cushion panel and small decorative patch do not need the same pile.
| Design need | Likely pile direction | Main tradeoff | Review point |
|---|---|---|---|
| Fine edge definition | Lower, controlled loops | Less dramatic texture | Shape readability |
| Soft field or background | Medium uniform pile | Higher yarn consumption | Coverage and hand feel |
| Sculpted accent | Taller or selectively cut pile | Greater snag and trimming risk | Recovery and edge transition |
| Beginner first project | Forgiving moderate height | May limit very fine detail | Tool control and repair |
Write the design intent before choosing a tool depth. Otherwise the team may approve the most dramatic swatch even though it is slow, unstable or impossible to pack with the planned yarn quantity.
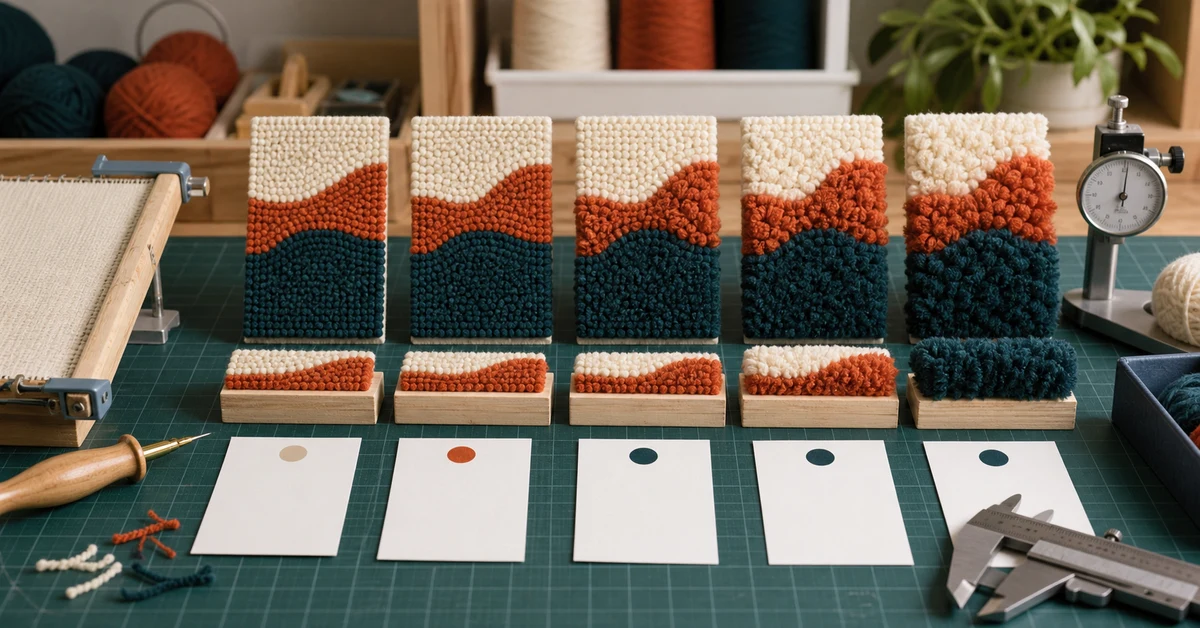
Build a controlled loop-height ladder
Use one fabric lot, yarn lot, hoop or frame condition and punch technique. Make five samples across the practical tool range, including at least one setting expected to be too low and one expected to be too high. Keep punched area, spacing and pattern geometry constant.
- Set and record the tool depth or spacer condition.
- Thread the approved yarn without changing its preparation.
- Tension the fabric to the defined working condition.
- Punch the same line length and fill sequence on each sample.
- Leave the samples uncompressed for a consistent rest period.
- Measure front appearance, side profile, weight and yarn consumed.
Make repeated specimens at the likely target setting. A single attractive swatch may come from unusually steady technique. Repetition shows whether the setting remains stable when hand angle and work rhythm vary within reasonable limits.
Measure pile without flattening it
Measurement pressure can change the result. Do not press a ruler into the surface and call the compressed value the loop height. Support a cut or exposed side edge, view it perpendicular to the fabric, and use a depth reference that touches lightly. Measure multiple points rather than choosing the tallest loop.
- Record average visual height across a defined sample line.
- Record the observed minimum and maximum within that line.
- Note lean direction, open loops and isolated protruding loops.
- Photograph the side profile with the same camera angle and scale.
- Measure again after light handling or packaging simulation.
Front-view coverage and side-profile height should be reviewed together. A sample can meet the nominal height while showing sparse fabric, irregular loop lean or a weak border.
Connect tool depth to the whole punching system
Tool setting does not operate alone. Yarn diameter, twist and friction affect how much loop remains on the surface. Fabric openings must release the tool and grip the yarn. Working tension controls whether the backing closes around the strand. The punching angle and how far the tool reaches the fabric also change effective pile.
| Symptom | Possible depth cause | Other possible cause | Isolation trial |
|---|---|---|---|
| Loops pull out easily | Depth too low | Fabric opening too large or yarn too smooth | Hold materials constant and increase one setting |
| Pile looks uneven | Setting shifts during work | Inconsistent tool insertion or fabric tension | Mark a controlled sample grid |
| Yarn will not feed | Depth creates excess drag | Yarn-tool mismatch or blocked path | Run a straight-line feeding test |
| Design edges blur | Loops too tall for scale | Pattern detail too fine | Compare a lower ladder step |
Review the setting with the approved punch needle yarn and punch needle fabric. Changing either component can move the stable pile range even when the tool has not changed.
Calculate the material consequence
Taller loops increase the yarn length held above the backing. The increase is not perfectly linear in a filled design because spacing, travel paths and repair also matter, but the sample ladder gives direct evidence. Weigh identical starting quantities or record the yarn used for the same punched area.
- Condition and weigh the yarn assigned to each sample.
- Punch the identical area using the defined sequence.
- Weigh the remaining yarn under the same condition.
- Add realistic waste from threading, color changes and correction.
- Repeat with target-level users before setting the kit reserve.
If a tall setting makes the pack visually impressive but creates a narrow yarn allowance, choose whether to reduce pile, add yarn or reduce filled area. Do not rely only on an expert prototype that has almost no correction waste.
Test retention, compression and recovery
A loop should remain stable through expected handling and presentation. Brush the sample lightly in several directions, flex the backing if the product will bend, and apply a controlled short compression that reflects packaging. After release, let the pile recover and compare it with the approved profile.
- No widespread loop withdrawal from normal surface handling.
- No permanent channels created by light compression.
- Acceptable recovery of height and direction after rest.
- No backing exposure beyond the approved visual limit.
- No edge loops that detach during ordinary finishing.
High pile may need more package clearance. Check the chosen hoop, finished dimensions and packing orientation together. The punch needle hoop size guide helps define the working area, but finished pile thickness also influences how the completed project or sample fits the pack.
Define trimming and cut-pile rules separately
Loop pile and cut pile are not interchangeable outcomes. If the design includes trimmed accents, specify where cutting begins, the target profile, tool type and how the boundary meets uncut loops. Cutting too close can release yarn or expose the backing; leaving irregular high strands makes the surface look unfinished.
Create a small finishing panel that shows:
- The acceptable untrimmed loop surface.
- The acceptable cut-pile surface.
- The transition edge between the two.
- A repair example for one accidental long loop.
- A rejected example with excessive trimming or backing exposure.
If trimming is not beginner-friendly, keep it out of the customer process and complete it before packing where the product format allows. A visually ambitious finish is not useful if ordinary users cannot reproduce it safely and consistently.
Transfer the target into instructions and inspection
The product record should identify tool setting, yarn, fabric, frame tension, punching side, insertion depth, spacing and target pile profile. Include a side-view photograph and a front-view sample at real scale. For adjustable tools, show the physical setting location rather than relying only on a name that may change between tool versions.
Customer checkpoints should be early and recoverable:
- Punch a short test row at the edge or on a spare fabric area.
- Turn the work over and compare loop height with the pictured sample.
- Brush lightly to confirm that loops remain seated.
- Check that the tool feeds without pulling the previous loop out.
- Adjust only through the approved instruction path.
Connect the loop target with the punch needle pattern design. Small details and narrow gaps may need a different texture decision than broad filled shapes.
Where Onehourcrafts fits
Onehourcrafts can help retailers develop punch needle kits by testing yarn, tool, backing, pattern scale and finished texture as one system. A useful inquiry includes artwork, finished dimensions, target user, desired surface, packaging format and any adjustable tool already selected. Buyers can request pile ladders, consumption comparisons and complete-system samples before confirming production. The approved punch needle loop height guide can then anchor both instructions and inspection.
This evidence gives the supplier a physical target and gives the buyer a reasoned tradeoff between texture, stability, material quantity and beginner success.
Frequently asked questions
What is the best punch needle loop height?
There is no universal best height. Choose it from pattern scale, desired texture, yarn and fabric compatibility, retention, material allowance and target-user handling. Approve the result on a complete sample system.
Why are loops different heights with the same tool setting?
Incomplete insertion, changing tool angle, unstable fabric tension, interrupted yarn feed and inconsistent working rhythm can all change the effective loop. Observe the process as well as the finished surface.
Should pile be measured immediately after punching?
Record the immediate condition if useful, then measure after a defined rest period without compression. Also check after realistic handling or packing because recovery is part of the product result.
Can a taller loop hide sparse punching?
It may cover the backing from one angle, but tall sparse loops can lean, separate or snag. Evaluate density, retention and side profile rather than using height to compensate for spacing problems.
When must loop-height approval be repeated?
Repeat it when yarn, fabric, tool geometry, setting mechanism, pattern scale, working tension, finishing process or package compression changes.
Approve texture with side-profile evidence
A reliable punch needle loop height guide connects the intended surface to a measured profile, material use and repeatable setup. Keep ladder samples, tool records, retention results, recovery photos and instruction checkpoints together so the texture remains stable from prototype through customer use.





