

A cross stitch fabric count guide should connect grid density to finished size, artwork detail, needle and thread fit, stitch visibility and target-user confidence. A higher count can produce finer detail in a smaller area, but it also creates smaller holes and tighter visual demands. Buyers should choose from stitched samples rather than category names alone.
Understand what fabric count changes
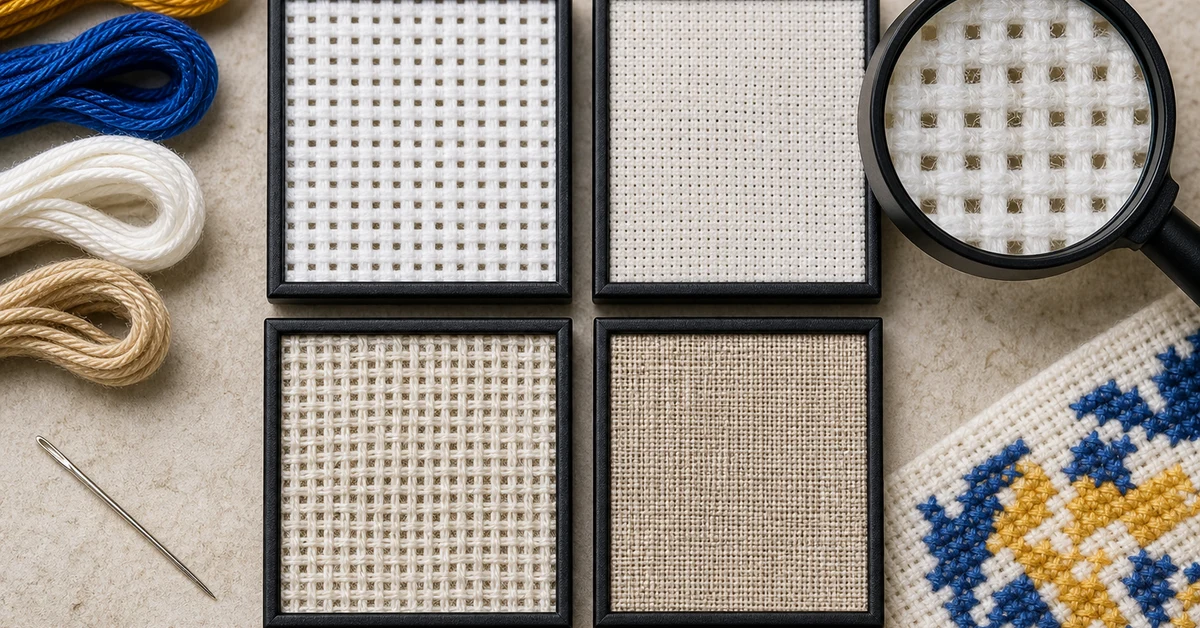
Fabric count describes the number of threads or squares across a measured distance, depending on the fabric convention. In counted cross stitch, it influences how many stitches fit into the finished area. As grid density increases, each stitch usually becomes smaller; as density decreases, the same chart occupies more space.
The number is useful only when the stitching method is defined. A design worked over one grid unit behaves differently from a design worked over multiple threads. State the fabric type, intended method and measurement convention in the specification. Confirm the physical sample rather than relying on an informal description from a listing.
- Finished dimensions for a fixed chart.
- Visibility and ease of locating holes.
- Maximum practical artwork detail.
- Needle and thread combination.
- Working time and error-recovery difficulty.
Calculate finished size before drawing the pack
Begin with the chart's stitch width and height. Divide each by the working fabric count in the same unit to estimate stitched dimensions, then add the required fabric margin for hooping, handling and finishing. Confirm the result with an actual sample because fabric finish, printing and handling can introduce variation.
Do this calculation before packaging dimensions and marketing claims are finalized. A revised fabric count can change the project scale, hoop fit, thread consumption and perceived value. If the kit uses a compact 7.3 by 7.3 centimeter hoop format, for example, the design must leave practical working and display space within that physical boundary.
| Decision | Lower grid density tends to | Higher grid density tends to |
|---|---|---|
| Finished design | Increase physical size | Reduce physical size |
| Hole visibility | Make placement easier to see | Demand finer visual control |
| Image detail | Favor bold simplified shapes | Allow finer transitions |
| Beginner handling | Often feel more accessible | May increase counting and recovery effort |
Make a four-fabric comparison card
Mount candidate fabrics at the same scale and label them outside the customer-facing artwork. Stitch an identical test tile on each using the proposed needle and thread. Include diagonal edges, a small curve, solid fill, isolated stitches and at least two adjacent colors. This reveals both appearance and handling.
Record time, insertion difficulty, misplacement, thread coverage and how easily a stitch can be removed. Photograph the tiles under normal room light and close inspection light. The best sample is not always the most detailed one; the target customer must be able to reproduce it.
- Verify the physical grid density of each candidate.
- Cut equal working areas with identical margins.
- Use the same thread, needle, stitch tile and operator.
- Repeat with target-level users under ordinary lighting.
- Retain the winning tile as a production reference.
Match needle and thread to the grid
The needle should pass through the intended holes without damaging the fabric or creating unnecessary resistance. Its eye must accommodate the selected thread count without roughness or repeated snagging. Complete the sample with production candidates rather than substituting a studio needle.
Review thread coverage on the front and congestion on the back. Too little coverage may leave the grid dominant; too much can create bulky intersections and difficult corrections. Dark fabric, light thread and printed guidance can change visibility, so test the actual color combination and pattern treatment.
Separate counted and pre-printed usability
A counted design relies on the chart and the maker's position tracking. A pre-printed design adds registration, mark clarity and removal behavior to the fabric decision. For printed kits, inspect whether pattern boundaries align with the grid across the full working area and remain clear after hooping.
A more open grid can improve visibility but does not automatically fix an inaccurate print. Conversely, a precise print does not make a very fine grid suitable for every beginner. Test the complete method the customer receives, including chart, symbols, printed marks, instructions and any stated care process.
- Counted kit: prioritize chart navigation and position recovery.
- Pre-printed kit: add registration and mark-strength controls.
- Hybrid kit: ensure chart, print and thread key agree exactly.
- Display-in-hoop kit: confirm both working margin and final presentation.
Use target-user sampling instead of assumptions
Give coded prototypes to people at the intended skill level. Observe the first five minutes closely: finding the center or start point, threading the needle, locating holes and matching the key. Continue long enough to test eye strain, counting errors and correction. Do not coach unless the instructions explicitly provide that support.
Compare completion accuracy, time, pauses and self-reported confidence. A fabric that allows more artwork detail may still be wrong for an entry-level promise. If the design needs a finer count, consider reducing color changes, simplifying edges or changing the stated skill level.
Inspect cut size, squareness and edge condition
Measure several pieces from different production positions. The grid should be square enough for the intended outcome, and the cut should provide the specified margin. Inspect edges for excessive fraying and verify that folds or packaging pressure do not permanently distort the working area.
If fabric is supplied in or around a hoop, check tension and slippage through a representative stitching session. If it is folded, test recovery and give clear setup instructions. Product photography should show the actual grid and project scale without enlarging detail in a way that creates a misleading expectation.
Lock the fabric approval bundle
The final cross stitch fabric count guide should leave a physical and written control set: approved fabric, measured grid, stitched test tile, full project, needle and thread references, cut dimensions, print standard and user-test record. Define which substitutions require a new full sample.
Use version identifiers for artwork and fabric because a change to either can alter size and legibility. Final claims about materials, care or compliance must be supported separately for the destination market.
- Fabric construction, color and verified count.
- Chart dimensions and calculated finished size.
- Needle, thread strands and coverage reference.
- Cut margin, hoop fit and packaging condition.
- Counted or printed method with approved instructions.
Translate the fabric choice into retail evidence
The product page and package should show the actual finished scale and enough grid detail for customers to understand the medium. Photograph the approved fabric and stitched sample together, but avoid enlarging the weave so dramatically that the project appears easier than it is. If several fabric counts exist across a range, explain the skill or visual difference rather than presenting the number without context.
Give customer service the same reference tile and terminology used by product development. Questions about hole visibility, dimensions, printing or thread coverage can then be answered from controlled evidence. A practical cross stitch fabric count guide connects the technical choice to:
- Accurate finished dimensions on the package and listing.
- Representative macro and normal-distance photography.
- Skill-level language consistent with user trials.
- Customer-service guidance for setup and expected appearance.
This step reduces the risk that a sound fabric specification is weakened by misleading merchandising.
Where Onehourcrafts fits
The Onehourcrafts cross stitch DIY kit page describes beginner-friendly pre-printed fabric, a compact hoop, thread, needle and custom pattern development. Buyers can use the comparison card and fabric approval bundle to evaluate the grid, artwork and supplied components together.
Review the cross stitch kit quality checklist, the small-kit factory guide and the guide to craft kit skill levels. Submit target dimensions, design method, fabric candidates, user level, pack format and quantity through the contact page for sampling and feasibility review.
Frequently asked questions
Does a higher fabric count always mean better quality?
No. Higher density can support finer detail, but it also creates smaller working spaces and may be less suitable for beginners. Quality depends on matching the fabric to the design, tools and user.
How is finished cross stitch size estimated?
Divide the chart's stitch dimensions by the working fabric count in the same unit, then add practical margins. Confirm the calculation with the actual fabric and a stitched sample.
What should a fabric comparison tile include?
Include straight and diagonal edges, a curve, solid fill, isolated stitches and adjacent colors. Use the proposed needle and thread so both appearance and handling can be compared.
Is pre-printed fabric easier for every beginner?
Not automatically. Printing can reduce chart navigation, but poor registration, weak marks or a very fine grid can still cause difficulty. Test the complete printed system with target users.
What fabric changes require reapproval?
Changes in count, weave, finish, color, print process, cut size or supplier source can affect stitching and finished dimensions. Repeat the relevant physical and user tests.





