

A punch needle edge finishing guide should select the boundary method from the finished use, backing behavior, pile security and customer skill level. Product teams should make a finish library using the approved fabric and yarn, then compare trimming, folding, stitching, binding, backing and mounting under handling and compression before choosing one production or kit instruction.
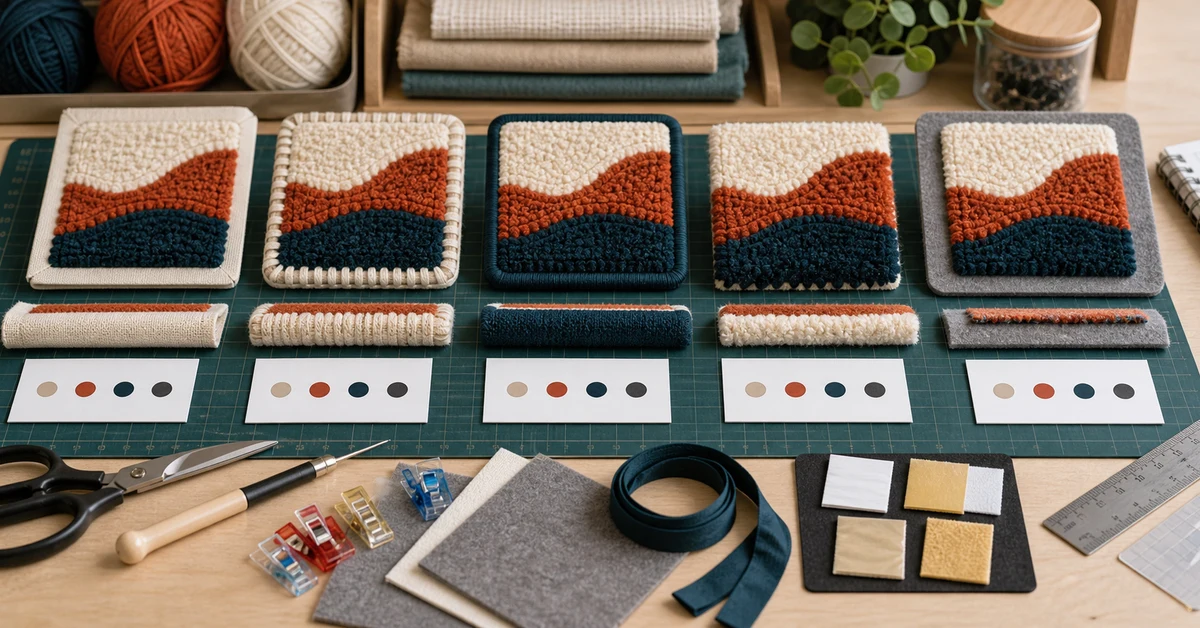
Map the risks at the project boundary
The center of a punch needle panel is supported by surrounding loops. At the boundary, cut fabric, changing tension and exposed backing create different risks. A finish must stop fraying, protect the last rows of loops and suit the object's use.
| Boundary risk | What causes it | Visible result | Control question |
|---|---|---|---|
| Fabric fray | Open or cut weave at edge | Loose threads and shrinking allowance | How is raw fabric enclosed? |
| Loop release | Last loops lack support | Thin border or pulled yarn | How far does pile stop from the cut? |
| Bulky corner | Folded layers overlap | Lump or distorted shape | How are corners reduced and secured? |
| Visible backing | Finish too narrow or pile sparse | Uneven frame around motif | What front-view border is acceptable? |
| Adhesive migration | Wrong product or excess application | Stiffness, staining or surface transfer | Has the complete material stack been tested? |
Define whether the finished item stays in its hoop, becomes a wall panel, patch, cushion face, bag component or another product. The same edge method should not be assumed suitable for every format.
Set the pile-to-cut allowance
Mark three lines on the backing: the design boundary, the final pile boundary and the fabric cut line. The space between them provides room for finishing without cutting loops or exposing an irregular gap.
- Punch the complete design using the approved pattern scale.
- Stabilize the surface and let the backing rest.
- Mark the intended visible edge from the front.
- Measure the allowance needed by each candidate finish.
- Cut only after confirming corner and fold requirements.
- Record the final dimensions after finishing.
Low and high pile may need different visual spacing. Use the punch needle loop height guide to connect the boundary allowance with the approved surface profile.
Build a finish sample library
Prepare identical small panels and finish each with one credible method. Keep motif, pile, backing lot and sample dimensions consistent. Label the reverse side so appearance ratings do not become detached from the construction record.
- Trimmed raw allowance: fast but dependent on stable fabric and protected use.
- Folded and stitched allowance: encloses the raw edge but can add bulk.
- Whipstitched boundary: offers visible handmade protection when spacing is controlled.
- Applied binding: creates a defined border but introduces another material and corner method.
- Backed panel: conceals the reverse and can stabilize edges.
- Mounted or hoop-retained finish: uses the display structure as the boundary system.
Do not rank methods by appearance alone. Record time, material cost, repeatability, repairability and the skill needed to complete the finish.
Compare sewing and folding methods
For sewn finishes, specify stitch type, spacing, thread, needle and how the first and final stitches are secured. For folded finishes, define fold width, corner reduction and whether the fold is pressed, clipped or temporarily held.
| Feature | Folded edge | Whipstitched edge | Bound edge |
|---|---|---|---|
| Raw fabric concealment | Good when fold is complete | Depends on coverage | Good when binding encloses edge |
| Corner bulk | Can be high | Usually moderate | Depends on binding overlap |
| Front appearance | Minimal if hidden behind pile | Decorative line may remain visible | Creates a distinct border |
| Beginner difficulty | Requires accurate allowance | Requires even spacing | Requires alignment and corner control |
Test the finish after the project leaves its hoop or frame. A fold that looks flat under tension may relax unevenly once released.
Evaluate backing materials as a system
A backing can hide thread paths, support the edge and create a clean reverse. Compare felt, woven fabric, board or another product-specific substrate for thickness, flexibility, color show-through, cut quality and compatibility with the attachment method.
- Does the backing remain flat without forcing the pile face to curve?
- Does its color show through open areas?
- Can it be cut to a clean, repeatable shape?
- Does stitching or mounting distort the edge?
- Can the finished product be repaired or separated if necessary?
- Does the material remain acceptable after storage and handling?
The backing used for punching also matters. Refer to the punch needle fabric selection guide because weave stability and fraying behavior determine how much support the final edge needs.
Control adhesives cautiously
Some finishes use adhesive to attach a backing or stabilize an allowance. Adhesive choice depends on the complete material stack and intended use. Test application amount, spread, curing condition, flexibility, odor, color change and migration. Follow supplier instructions and applicable product requirements.
- Prepare small coupons with the production yarn, fabric and backing.
- Apply a measured, repeatable amount using the intended method.
- Cure under defined time and environmental conditions.
- Inspect front and reverse for staining, stiffness or bleed-through.
- Flex, compress and store the sample before final approval.
- Confirm that customer instructions communicate safe, appropriate use where adhesive is included.
More adhesive is not automatically more secure. Excess can harden the textile, reach the pile or create uneven edges. Where a chemical product is part of the retail kit, qualified compliance review may be needed for the target market.
Test corners, curves and narrow projections
A straight sample does not validate a shaped project. Include at least one outside corner, inside curve and narrow section if the design contains them. These areas expose allowance shortages and bulk.
| Geometry | Main issue | Trial | Acceptance evidence |
|---|---|---|---|
| Outside corner | Layer overlap and exposed point | Compare clipped and folded variants | Flat front and secure reverse |
| Inside curve | Allowance bunching | Use controlled relief cuts if permitted | No front distortion or fray path |
| Convex curve | Edge tension | Compare stitch spacing | Smooth silhouette |
| Narrow projection | Insufficient support | Handle and flex repeatedly | No loop release or bending damage |
Where geometry is too fine for a stable finish, revise the punch needle pattern design instead of forcing an unsuitable boundary method.
Run handling and recovery checks
After finishing, brush the pile, flex the panel if its use permits, handle corners and apply short realistic compression. Inspect immediately and after rest. For mounted work, check that attachment remains secure and the panel does not creep inside the frame.
- No new fraying beyond the controlled edge.
- No released loops near the boundary.
- No backing separation, lifting or shifting.
- No permanent corner curl or edge wave.
- No visible adhesive migration or surface hardening.
- Finished dimensions remain inside the approved range.
Write the finish as a sequence with checkpoints
Customer instructions should show where to stop punching, how much fabric to leave, when to remove the work from the frame, how to cut and how to secure the boundary. Put irreversible steps after a measurement and visual check.
- Confirm the final pile boundary from the front.
- Mark the cut line using the supplied template or dimension.
- Check corner and curve allowances.
- Cut with the specified tool and orientation.
- Apply the approved fold, stitch, binding, backing or mount.
- Inspect front silhouette and reverse security.
The working frame must leave enough access for the process. Use the punch needle hoop size guide to confirm workspace and removal steps.
Where Onehourcrafts fits
Onehourcrafts can help retailers develop punch needle kits by testing the full material stack from tool and yarn through backing, edge treatment and presentation. A useful inquiry includes artwork, finished use, dimensions, target skill level, preferred display format and any included finishing materials. Buyers can request edge sample libraries and handling evidence before selecting the retail instruction. The punch needle edge finishing guide should then define the customer-facing finish and the inspection reference.
Where the finish is completed in production rather than by the customer, buyers can also define appearance samples for front border width, reverse alignment and corner shape so final inspection evaluates a visible standard.
Resolving the boundary during sampling also improves packaging decisions because finished thickness, rigidity and corner protection become known before carton approval.
Frequently asked questions
Can punch needle fabric be cut close to the loops?
Only if the tested finish and backing provide enough support. Cutting too close can release edge loops or leave insufficient material for folding, stitching or mounting.
Does every punch needle project need adhesive?
No. Many projects can use sewing, binding, backing or a retained hoop. Select adhesive only when it suits the material stack, product use and applicable requirements.
What is the easiest finish for beginners?
Difficulty depends on geometry, backing and included tools. A simple retained hoop or clearly templated backing may be easier than accurate binding, but the complete method should be tested with target users.
How can edge loops be protected?
Leave a controlled pile-to-cut allowance, maintain stable backing tension, avoid cutting working loops and use a tested finish that supports the perimeter without compressing the design.
When should finishing tests be repeated?
Repeat them after changes to yarn, backing fabric, pile height, shape, finished use, backing material, adhesive, thread, mounting or package compression.
Approve the boundary with the surface
A reliable punch needle edge finishing guide treats pile, backing, allowance and final use as one system. Keep finish samples, material records, geometry trials and handling results together so the selected edge remains clean, secure and realistic for the intended customer.





